Geeni cameras scan QR codes to seamlessly pair with your device. This does sometimes have its hiccups though, as users occasionally report errors in the scanning process. But not to worry - this is a known but easily resolvable issue!
Failures in QR code scanning are normally caused by camera obstructions, dim screen settings, and occasional bugs in the Geeni app. Fortunately, there are many user-attested fixes for each issue (with the top solutions listed below!).
What’s more, the Geeni app also allows you to bypass the QR scanning process by enabling Easy Mode. As such, you have plenty of options to resolve a failed QR code scan - we will guide you through each one step-by-step!
3 Fixes for a Geeni Camera that Won’t Scan QR Code
Adjust your screen settings
QR codes are essentially messages encoded into a visual black-white pattern - if your Geeni camera can’t distinguish between black and white, then it won’t be able to read the code. This typically happens with dim or uniquely configured screens.

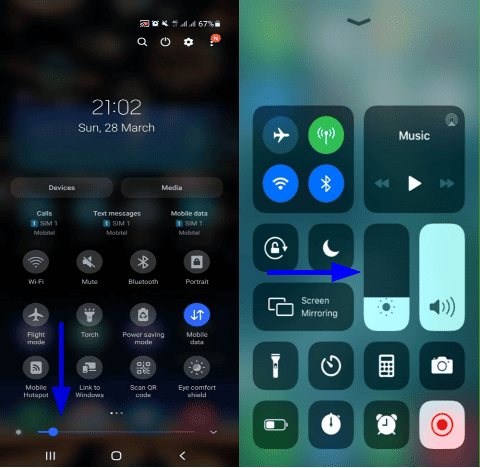
When showing the QR code to your Geeni camera, ensure that your screen is at the highest brightness. To do this, simply drag down the top of your device’s screen and move the brightness slider on the quick panel, as shown above.
Turn off dark mode and blue light filtering
Certain devices also come with a built-in dark mode and blue light filtering (aka eye care and night shift mode), both meant to reduce eye strain.
Depending on the device, they can invert colors or force low screen brightness- sure ways to cause issues with QR code scanning! For some users, these well-known culprits for QR code scan failures may be active for so long, they forget that they exist. Thankfully, both modes can be disabled very quickly by toggling them in your device’s settings for both Android and iOS devices.
Remove any obstructions to the camera
One of the most common reasons a Geeni camera fails to scan a QR code is because the camera's view is partially blocked.
That said, make sure there are no objects obstructing your Geeni camera’s view. This may seem obvious, but some obstructions can be sneaky.
For instance, shadows are an often-overlooked obstruction. When scanning the QR code on your device, ensure that your Geeni camera is in a well-lit place free from shade.
Clean the camera lens

Even a little debris can prevent the camera from focusing properly during a scan, so it’s best to consider cleaning the lens. While a simple fix, you’d be surprised with how much this works!
Before initiating the scanning process, check for dust or smudges on the camera lens itself. Then, clean the lens using a microfiber cloth, preferably with screen cleaning fluid. This should clear any debris preventing your camera from scanning your QR code.
Switch to Easy Mode
As QR mode is the default painting option for the app, it’s easy to assume that it’s the only option. However, you can totally skip the QR scanning process via the Geeni app’s Easy Mode!
With Easy Setup mode, you’ll only need to wait for the app to pair your Geeni smart camera until its status indicator blinks - no need for a QR code at all.
Enabling easy mode is much like pairing your smart camera as normal. You’ll only need to do one minor adjustment, as explained in the steps below:

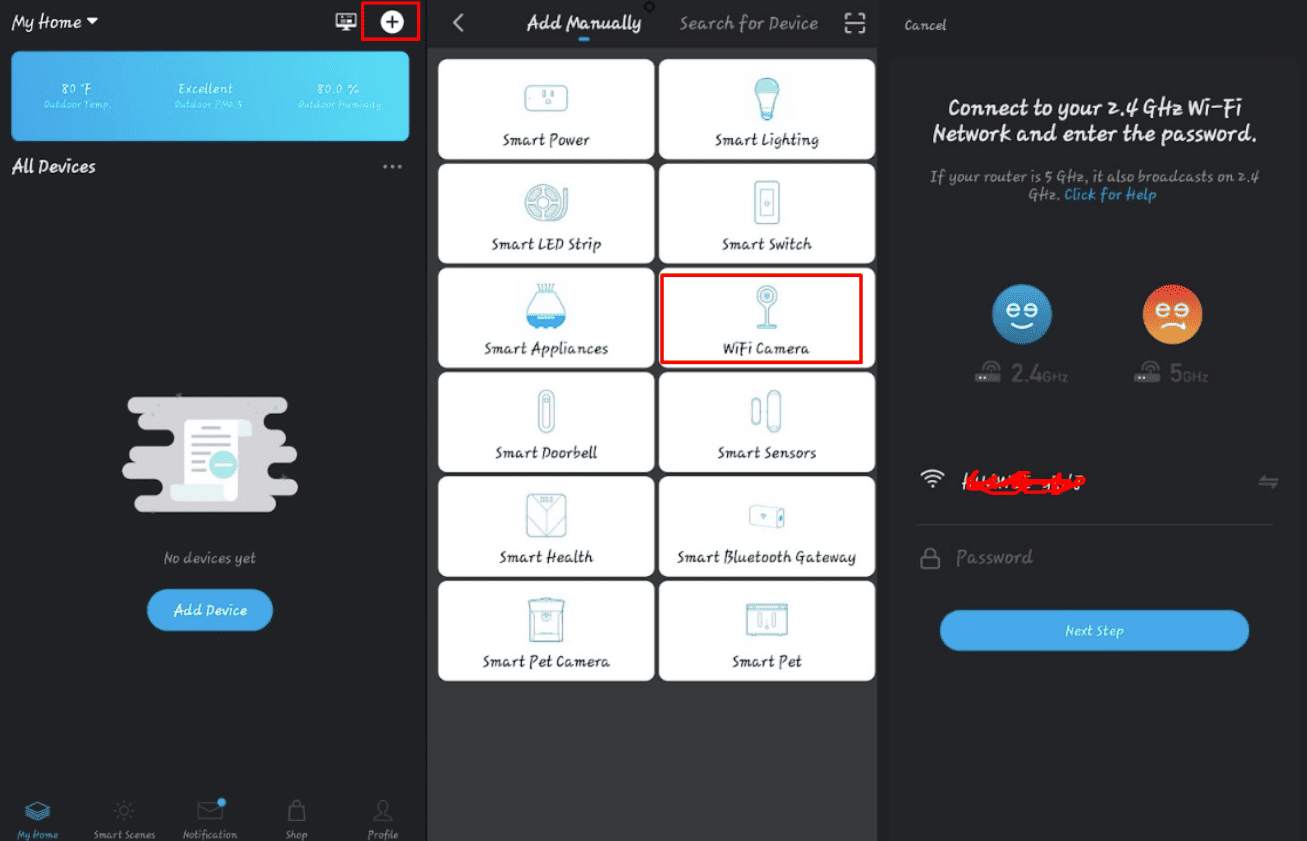
- Reset your Geeni smart camera by holding down the reset button or inserting a paperclip into its reset hole. Then, open your Geeni app and tap on the ‘+’ sign in the top right.
- Navigate to WiFi Camera and enter your WiFi password on the next screen. Afterwards, select Next Step.

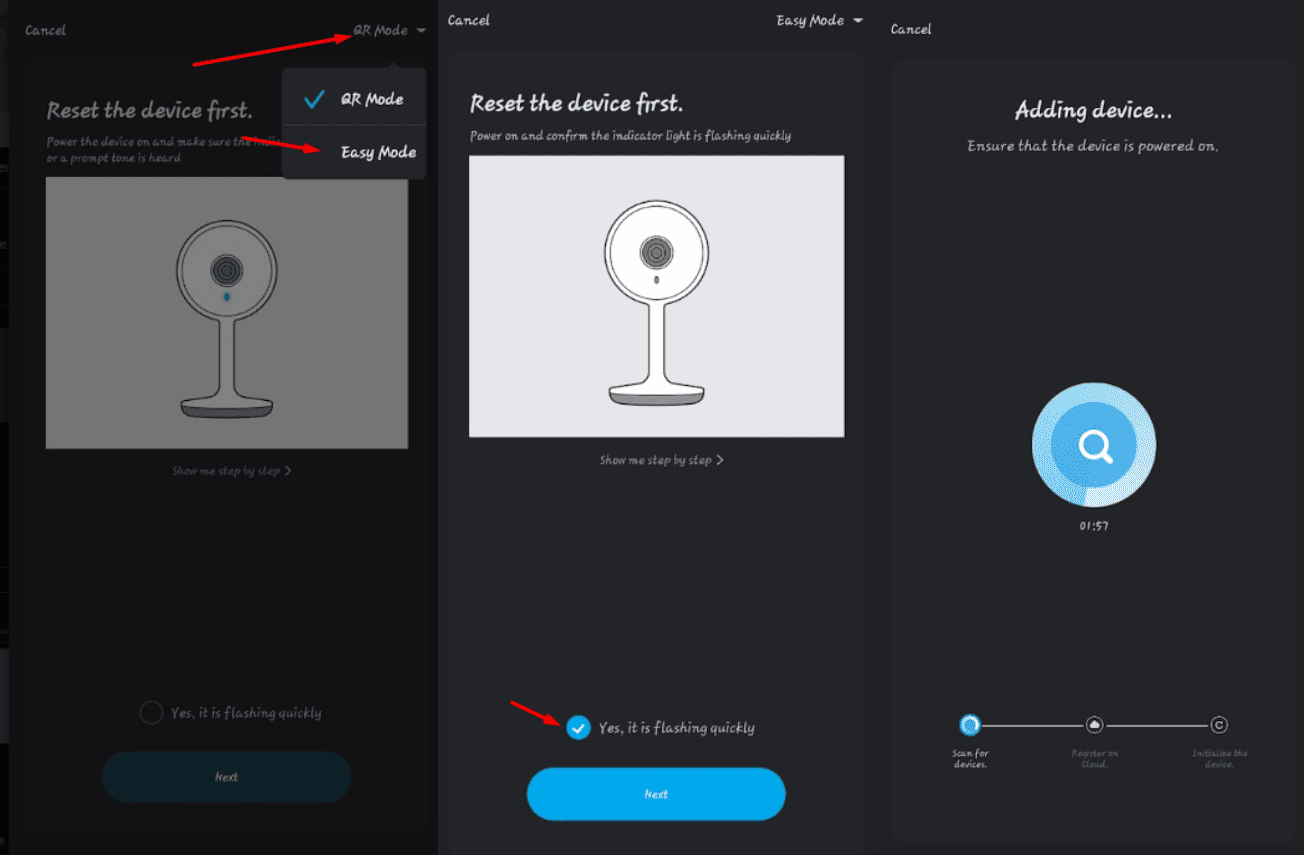
- You should see QR Mode in the top right corner. Tap on this, select Easy Mode, and confirm ‘Yes, it’s flashing quickly.’
- Tap on Next Step and wait for about two minutes. Once your smart camera has been connected, finalize the process by hitting Done.
Your camera should now be paired to your device without issues - all without having to use a QR code!

